
Settings Column
The Routing Setup dialog allows you to configure the operations in the Routing Strategy dialog. It is displayed by double-clicking in the Settings column for a relevant row. Alternatively, point the cursor at the relevant row in the Settingscolumn and click the displayed "..." button.
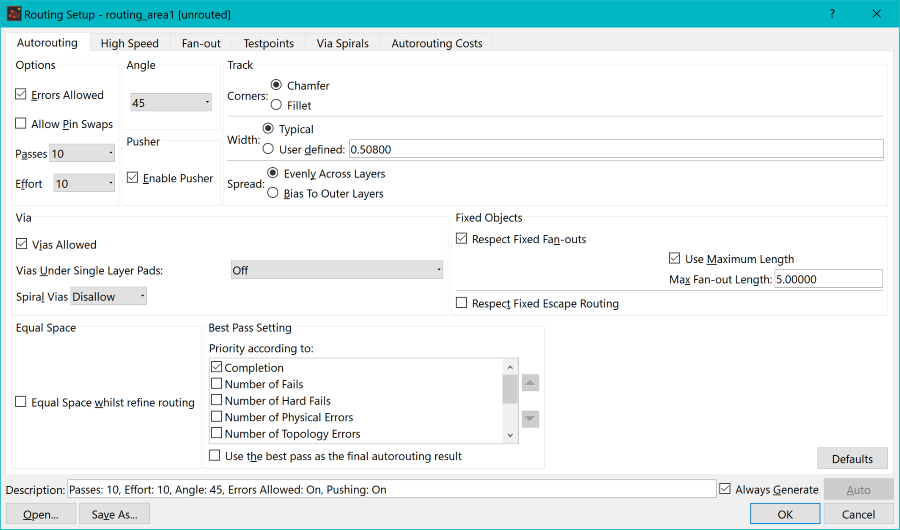
Figure 1: Settings
The most important settings are listed below for each tab in this dialog.
| Item | Description | |
|---|---|---|
| Autorouting | ||
| Passes | Controls the number of times that the autorouter or the Refine routing command attempt to route the selected nets. The default value is "10". Click Defaults to reset all values in this tab to the default. | |
| Respect Fixed Fan-outs | Select this option to force the autorouter to connect to pre-existing
fan-outs, or fan-outs that are generated by a previous task.
|
|
| Vias under single layer pads | Controls whether via-in-pad technology can be used.
|
|
| Pusher | It is recommended that the pusher is always on. This provides better performance from the autorouter. | |
| High Speed | Allows you to configure how the Lengthen operation is handled by the Autorouter command. Click Defaults to reset all values in this tab to the default. This tab is displayed only in a High Speed environment. | |
| Automatic tools modify length nets | Specify whether the Autorouter can modify nets that have already been lengthened. Deselecting this setting may reduce the effectiveness of the Autorouter. | |
| Length-nets re-lengthened after automatic tools | Specify whether the Lengthen operation is automatically launched after certain operations are executed. | |
| Use pusher to make space for lengthening patterns | Specify whether other tracks can be pushed by lengthening patterns during the Lengthen operation. In the Effort box, you can set the number of times this is done in order to meet relevant constraints. | |
| Fan-out | Fan-out sections | The following sections are in this tab. These
sections are executed in the order listed.
|
| Layer pair | Controls the desired target
layers for the fan-out.
|
|
| Spiral Vias | Controls whether build-up technology is used, or whether only through hole vias can be used. | |
| Via Position | Controls where the via
is placed in relation to the pad.
|
|
| Testpoints | If either of the check boxes in the Layers section are selected, then the autorouter generates testpoints on either the top or bottom layers, or both layers. You can also select the specific pads or padstacks that are used for these testpoints. | |
| Via Spirals | Controls the shape of the spiral vias that are generated by the fan-out tools. The spiral vias obey the current build-up settings for the design. | |
| Autorouting Costs | These are advanced settings, which are not described in this training. |
Note
You can save the settings in the Routing Setup dialog by clicking Save As.
You can save the settings in the Routing Setup dialog by clicking Save As.
Next topic: Targets
Column
Related Topics
Operation Column
Text/Comment Column
Objects Column
Layers Column
Related Topics
Operation Column
Text/Comment Column
Objects Column
Layers Column
