
The Add Route dialog
Add Route Dialog
The Add Route command dialog, shown below, allows you to control the input of routing patterns. For example, input wire parameters such as push aside, track width and routing style are specified in this dialog.
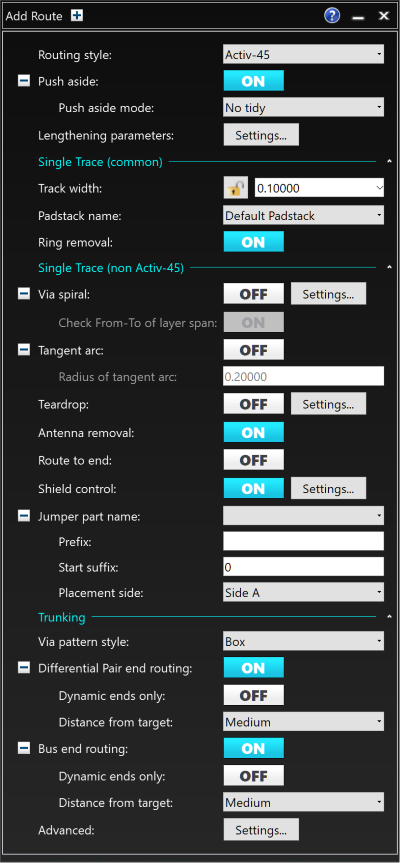
Figure 1: The Add Route Command Dialog
Overview
Routing a single connection
- From the Net/Route tab, select the Add Route icon.
- Set the parameters within the Add Route Command dialog to your requirements.
- Hover the cursor over the start point of an unconnected net and click it (zoom in as necessary).
- Drag the cursor over the board, as required, and, if necessary, click again to insert a corner and continue the operation to the end point. The track is now routed on the board.
- If you require to back up a track, either route back over the track or select backspace.
- Should it be necessary to add a via, double click at the required location (Via Grid can be enabled to ensure the via is placed on the grid).
- To delete a track segment, select it by clicking, and select Unroute from the Net/Route tab of the ribbon.To delete a routed net, select it by clicking or, on the assist menu, expand the selection to Net, and click Net/Route > Unroute.
| Autonomy | Routing Method | Features |
Ideal Use |
|---|---|---|---|
| Automatic |
Auto-Routing |
|
Fully automated error free routing. |
|
Auto-Interactive |
Activ-45 |
|
Assisted routing of individual tracks and design optimization.
|
|
Trunk Routing |
|
Handling sets of signals and differential pairs as whole objects rather than individual tracks. |
|
|
Differential Pair |
|
Impedance matching and improved EMC performance. |
|
| Manual |
Manual |
|
Individual routing of tracks. |
Activ-45
Activ-45 is a true 45-degree routing algorithm that can effortlessly route through dense areas of a design. Using enhanced pusher technology, the route path follows the cursor with minimal disruption of existing routing patterns.
Trunk Routing
Trunking gathers signals such as differential pairs and busses together to route in a single operation. This makes it easier for you to route several signals at the same time. Tracks routed using trunking are converted into a trunk. You can then move or edit these while the spacing between the signals is maintained. You also have the option to finish the end routes as they approach the target pads.
Overview
- Select the relevant active layer.
- Frame select the required unrouted tracks.
- Click the Add Route button. This will immediately begin routing a trunk by routing the individual connections to a gathering point.
- Click to place the gather point. The connections are now being routed as one wide connection.
- Route the trunk to its destination.
Differential Pair Routing
Differential pair signals use specific design rule stacks and constraints. These design rule stacks and constraints are created in the PCB Design Rule Editor and the Constraint Browser, and comprise two opposing nets. It is recommended that they have the same name, with the only difference being the prefix or the suffix.
- Differential pairs are constrained at a pin pair level.
- When routing differential pairs in Route mode, a unique command dialog is used. When selecting a route or connection, the associated route or connection automatically adheres to it. When routing in this mode, the differential pairs are routed as small trunks.
- Differential pairs have the following properties:
- They are routed using differential pair design rule stacks.
- They observe area rules, and adjust the track width according to the design rule stack.
- They are routed using track width stacks and spacing rule stacks that are derived from differential pair design rule stacks.
- They are routed as trunks.
- They observe area rules.
- They can be moved as trunks.
Overview
- Click the Add Route button to display the Add Route dialog.
- Change the active layer to the required layer.
- Route a differential pair by selecting a net which is part of the differential pair. The dialog immediately changes to support differential pairs.
- Click to set the first gather point, and resume routing the connections as a pair.
- Click to place a corner, and then continue routing the pair towards the target pins. As you approach the target pins you will see the end zone appear.
- When you see the ends of the pair appear to finish, right-click and select Finish on the assist menu.
