
The following procedures describe how to define the format of the labels that show the connected sheets for a sheet connector, and display them on the canvas. For non-hierarchical designs, these are displayed in the Property Viewer.
Connecting Sheets
- In two separate sheets, add a sheet connector to the same net. This is done by clicking the Component > Add > Sheet split button on the eCADSTAR Schematic Editor ribbon, and then selecting a sheet connector.
- Right-click one of the sheet connectors, and select Connected sheet on the assist menu. In the displayed list, click a sheet.
Specifying the Format of Labels for Connected Sheets
- Click Sheet > Label > Cross Reference on the ribbon.
- In the Cross Reference dialog, specify the format that is used for connected sheets in the Property Viewer. This is applied to all sheet connectors on the canvas.
Displaying the Property Viewer for Sheet Connectors
- On the canvas, select a sheet connector that is used to connect the sheet to another sheet.
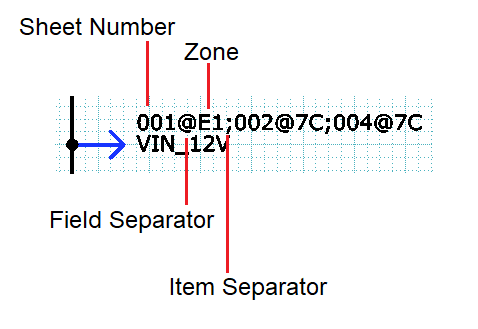
- In the Properties Panel, right-click the XY location label row and select Display Viewer on the assist menu. The Property Viewer is displayed in the specified format for the relevant sheet connector. This is illustrated below.
Note
When printing to a PDF file, note the following if you create bookmarks for sheet connectors.
When printing to a PDF file, note the following if you create bookmarks for sheet connectors.
- If Move
between hierarchy and connector is selected in the Print
dialog, then you can browse the hierarchy of blocks in the PDF file
by clicking them, or by using the assist menu.
- eCADSTAR's net array notation naming is not supported in Adobe Acrobat.
