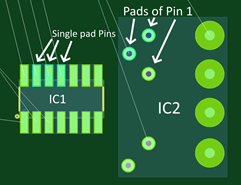
A multipad pin has more than one pad which are on the same net and considered electrically connected internally.
The following routing tools make use of all pads of a multipad pin as if they are all on the same subnet and electrically connected:
- Activ-45 allows routing to all pads of multipad pins.
- Trunk/Bus end routing allowed to route to all pads of multipad pins.
- Autorouter allowed to route to all pads of multipad pins.
Multipad pin routing enables routing route to or from any one of the multipad pin’s pads, i.e. to the nearest of the internally connected pads. A pin with more than one pad can be routed to as if all the pads belong to this pin.
Activ-45 Routing
Routing using Activ-45 will allow routing to and from any pad on a multipad pin.
Routing to a multipad pin will automatically end route to the closest of the internally connected pads (like any other single pad pin).
Routing from one pad of a multipad pin to another pad on the same pin will not autocomplete the route. You will need to confirm this type of routing is required, by left clicking. A cross will indicate a target that has not been autocompleted.
If there is already a route between the source and target pins and this route is unfixed the route, with Ring Removal set to 'ON', Activ-45 will remove the ring on auto-completion. However, if the original route is fixed then the new route will not be auto-completed near the target pin as the ring cannot be removed.
Source: Multipad Pin
To begin routing from a multipad pin:
- Select the pad from which routing will originate and then click Add Route. Alternatively, click Add Route and then select the pad.
- Set the Routing Style to Active-45 in the routing tool.
- Routing will begin from the selected pad.
- Create the chosen route to the target pad.
- When approaching the target pad, Activ-45 will complete the route automatically.
Target: Multipad Pin
To end a route on a multipad pin:
- First route into the area of the pin on which the route should finish.
- Finish the route on a multipad pin by route towards the desired pad until close enough to the bounding box for the route to automatically finish the route to this nearest pad.
The pins is highlighted with a bounding box around each pad of the pin.
Alternatively, move the cursor over the pad for the routing to automatically complete.
If routing to a multipad pin that has existing routing between this pin and the current source of routing, this existing routing will be removed as the route autocompletes.
If this existing routing is fixed, the existing routing will not be removed, but the routing will not autocomplete. You will need to manually click on the pad to finish the route.
Source and Target: the same Multipad Pin
To route between two pads of the same pin:
- Select the desired pad from which to begin routing and click Add Route. Alternatively, click Add Route and then select the desired pad.
- Route between the pads and move the cursor over the desired target pad of the multipad pin.
- Click on the pad to finish the route on this pad.
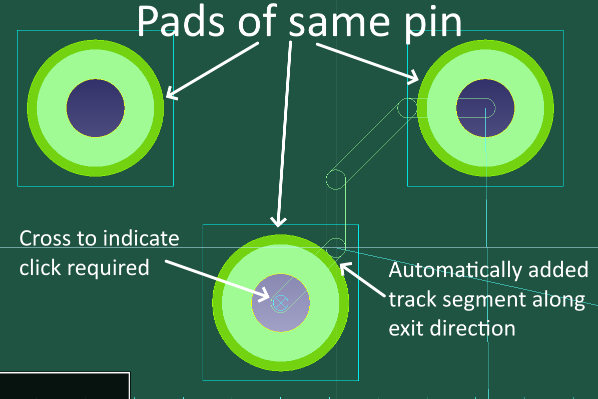
- To finish a route on a multipad pin simply move the mouse over the pad. If the pad belongs to the same pin from which the route was started a left click will be required to finalize the route.
A stub will be inserted along an exit direction of the pad and the track will be snapped to this stub.
As the pad belongs to the same pin from which the route was started, the routing will not autocomplete.
Instead, a cross will be displayed indicating that a click is required to finish the route.
Bus Routing
Bus routing to/from a multipad pin will use the closest pad to the bus for bus end routing.
Source: Multipad Pin
To create a bus route starting at any number of Multipad Pins and Regular Pins:
- Select Bus Route from the Net/Route ribbon.
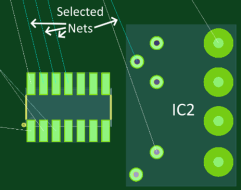
- Then select all connections or pads to be routed from. For multipad pins, select any one of the pads of that pin. If more than one pad is selected it will still result in only one track in the Bus for this pin.
- From the assist menu click Selection End to begin Bus Routing.
- Alternatively, select any pad from the desired pins to be routed or the nets and then select Bus Router from the Net/Route ribbon.
- Move the Bus into the End Routing target area and wait for End Routing to be calculated.
- Once End Routing is calculated, left click to confirm the routing
- Route the bus as required.
End routing is indicated from the multipad pin’s nearest pad to the start of the Bus.
If there are multiple multipad pins there may be multiple End Routing target areas.
Target: Multipad Pin
To create a Bus Route ending at any number of Multipad Pins and Regular Pins:
- Route the Bus into the End Routing target area and wait for End Routing to be calculated.
- Once End Routing is calculated, left click to select the end route and select ‘Finish’ from the assist menu to confirm the End Routing.
If there are multipad pins there may be multiple End Routing target areas, which prefer different pads of the pins.
End routing is indicated from the multipad pin’s nearest pad to the end of the Bus.
Trunk Routing
Trunk routing to/from a multipad pin will use the closest pad to the trunk for trunk end routing.
Source: Multipad Pin
To create a trunk route starting at any number of Multipad Pins and Regular Pins:
- Select all connections or pads to be routed from. For multipad pins, select any one of the pads of that pin. If more than one pad is selected it will still result in only one track in the Trunk for this pin.
- Alternatively, the nets to route can be selected.
- Click Add Route from the Net/Route ribbon or the assist menu, to begin Trunk Routing
- Move the Bus into the End Routing target area and wait for End Routing to be calculated.
- Once End Routing is calculated, left click to confirm the routing
- Route the Trunk as required.
End routing is indicated from the start of the Trunk to the multipad pin’s nearest pad.
If there are multiple multipad pins there may be multiple End Routing target areas.
Target: Multipad Pin
To create a Trunk Route ending at any number of Multipad Pins and Regular Pins:
- Route the Trunk into the End Routing target area and wait for End Routing to be calculated.
- Once End Routing is calculated, left click to select the end route and select ‘Finish’ from the assist menu to confirm the End Routing.
If there are multipad pins there may be multiple End Routing target areas, which prefer different pads of the pins.
End routing is indicated from the start of the Trunk to the multipad pin’s nearest pad.
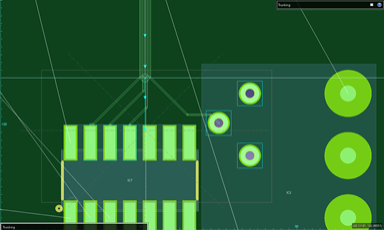
Alternate Bus/ Trunk Routing due to Multipad Pin
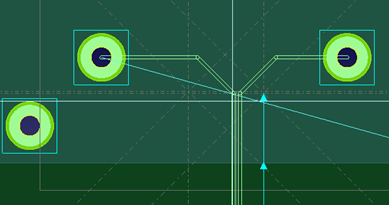
The result of Bus or Trunk Routing to/from a multipad pin can vary based on the position of the cursor. Choosing a specific pad of a multipad pin to route to/from is only possible by varying the position of the cursor. As shown below:
Bus/Trunk Routing alternative routing start:

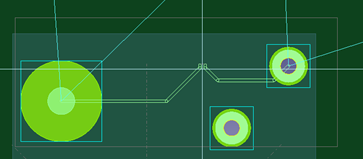
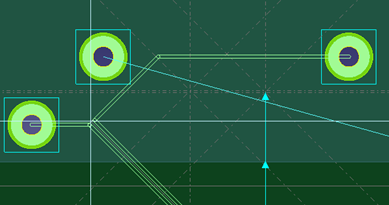
Bus/Trunk Routing alternative routing end: