
Click File > Import in Simulation Library Manager to import model data into the Simulation Library. The Import command initially opens a file selection dialog for the supported file and models data types. When a suitable file is selected, relevant content is shown in the Simulation Library Import dialog, depending on the type of contained model data.

The Import command provides a tree view which shows the model content for the file, and a Data tab which provides a description of the selected data. A comment section is displayed at the bottom of the dialog.
If more than one entry is selected in the tree view, then a preview is shown in the Data Preview view. This shows a fixed number of lines per entry that is selected in the tree view.
You cannot edit the displayed data directly in the Data view. Instead, click
 to use an external editor.
This general structure is the same for all supported file types. Depending on the file type, more detailed information about the opened model file is shown.
See below for more details on:
- IBIS files
- SPICE files
- IXF and IXFZ files
- IdEM files
Menus
| Value | Description | |
|---|---|---|
| File |  Open Open
|
Opens a File selection dialog. This allows you to specify a model data file to be imported. |
 Exit Exit
|
Closes the Simulation Library Import dialog. View the imported data in Simulation Library Manager. | |
| Edit |  Edit Edit
|
Opens an external text editor of your choice. This allows you to manually edit a file before importing it. For example, to change a component's name. The editor is selected based on the file association that is specified on your computer. The data that is displayed in the Data box cannot be edited directly. |
 Import Import
|
Performs the import of the model data into the simulation library.
Depending on the size and type of the model data, this may take
a few minutes. This is because numerical processing steps
are required to prepare the models for use in analysis procedures.
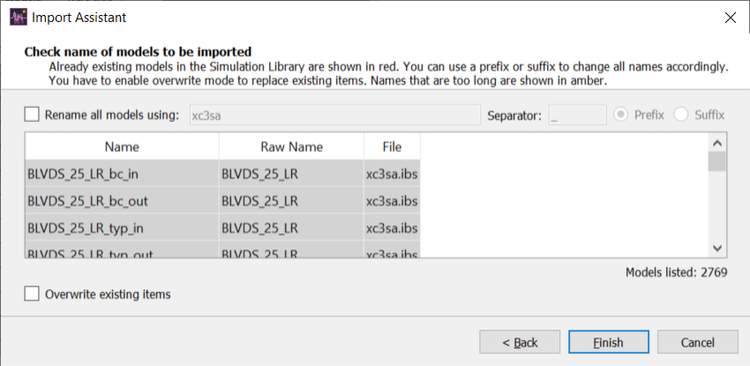
The Import Assistant provides
guidance and useful options on the import process.
|
Toolbar
| Value | Description |
|---|---|
|
Open
|
See Open, above. |
|
Edit |
See Edit, above. |
|
Import |
See Import, above. |
Layout
| Value | Description |
|---|---|
| Filter | The Filter box allows you to reduce
the number of entries in the tree view. The filter is not case
sensitive. Filtering begins as soon as you enter a value. When
you press Enter, the entered text
is saved and can be re-selected if required.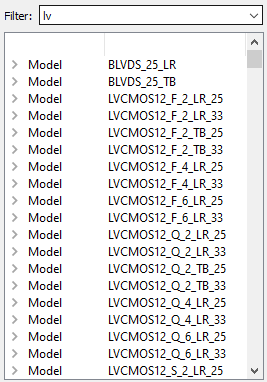 |
| Model list | A tree view of the file's model content.
Note
|
| Data view | A description of the item that you select in the Model
list.
Note The displayed data cannot be edited directly in the Data box. Instead, click Edit
to use an external editor. |
| Comment box | Displays any comments for the item that you select in the Model list. |
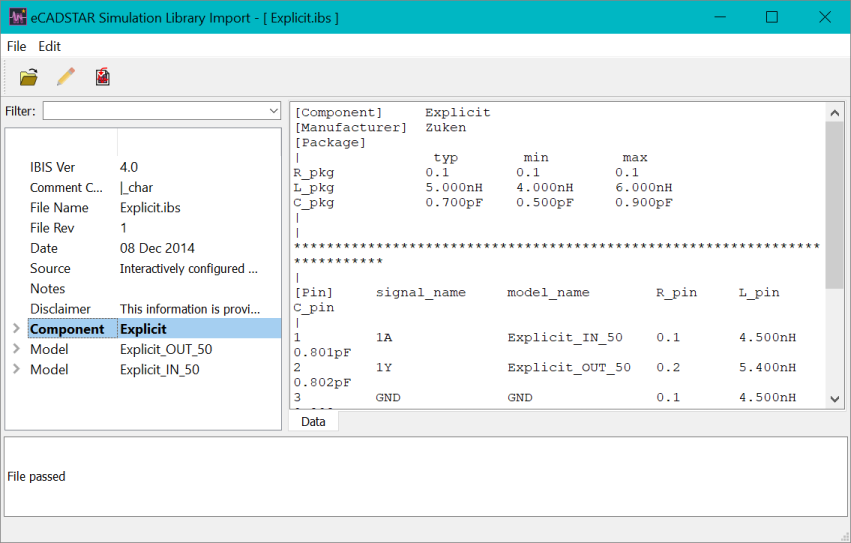
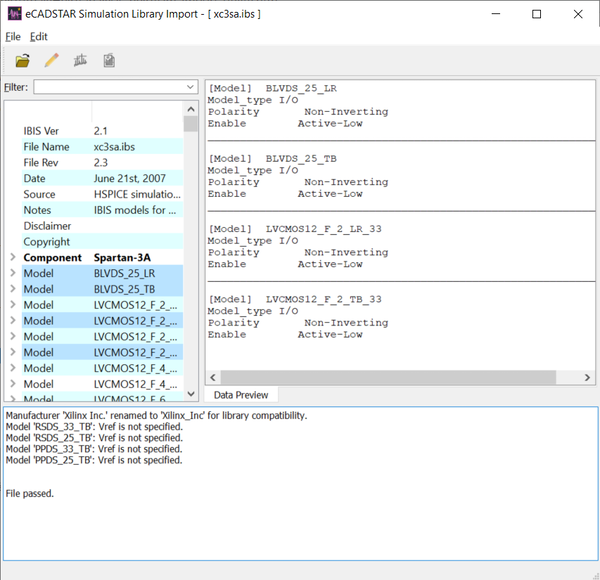
IBIS Import
When IBIS files are opened the tree shows general IBIS file information followed by the list of models contained.
Potential warnings and errors are listed in the lower part of the Import dialog. To determine the reason for the warning or error, view the list of IBIS Warnings and Errors, if required.
- Select the component entry marked in bold to allow the import of the selected device with all its models and package data as provided within the IBIS file(s).
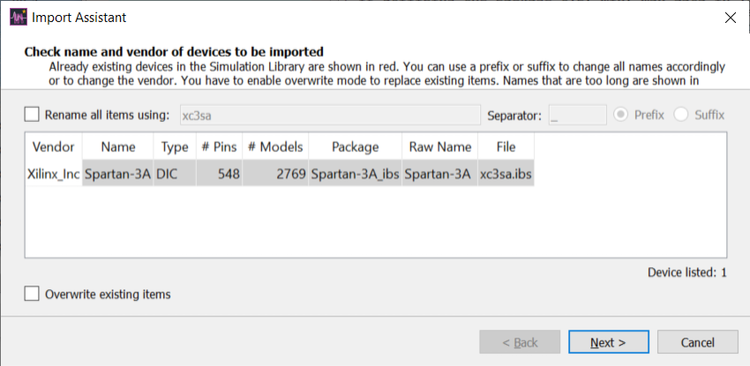
- Click the
 Import button in the toolbar to launch the import process. The Import Assistant dialog provides guidance and useful options on the import process.
It is not possible to import a selected IBIS model only. Import and Export are based on complete devices.
- Open each Model entry in the Model list, by clicking on
 to expand the tree view and inspect the model data in greater details.
 - Depending on the selected model keyword, more tabs are shown in addition to the Data view:
- Use the assist menu action
 Copy Chart to copy the graphics into another application. This includes the shown legend.
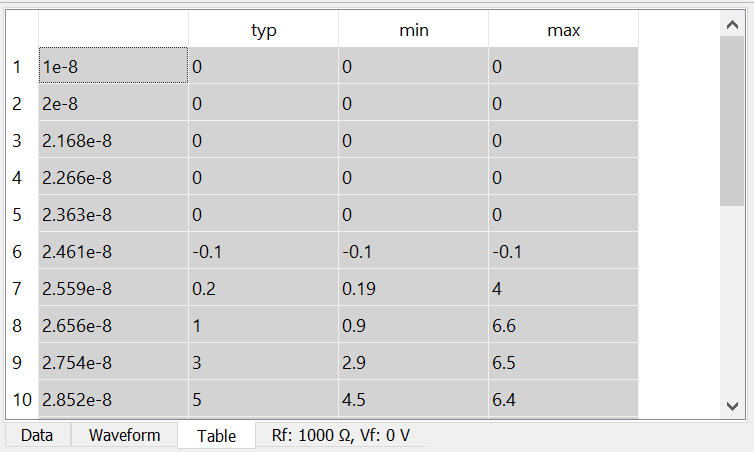
 - The table contents can be copied and pasted into other applications.
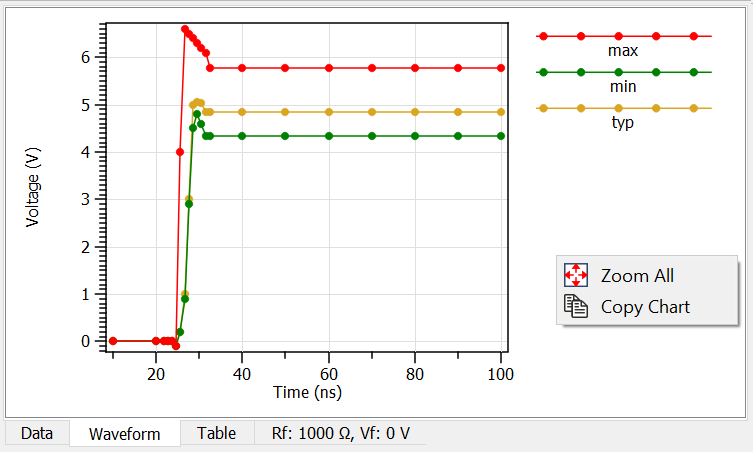
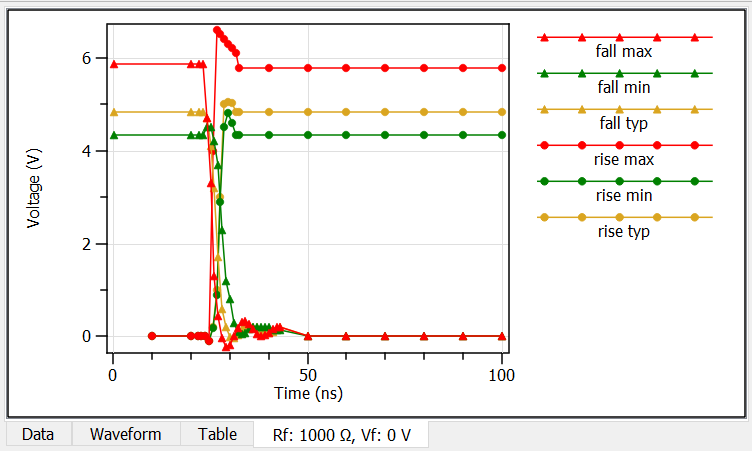
Viewing the Chart
You can move the displayed charts by dragging them with the middle mouse button pressed.
You can move the visible chart area using the arrow keys.
Select  Zoom All on the assist menu to show all selected characteristics.
The + and - keys allow you zoom in or out, respectively, for a selected chart. Alternatively, use the wheel mouse to zoom in or out. The current mouse position is the focal point of the zoom action.
Modify just the vertical axis of a selected chart using the Shift key.
Modify just the horizontal axis of a selected chart using the Alt key. This is illustrated below.
IBIS Modeling
See Simulation Library: IBIS Support for details regarding the modeling process in the Analysis Module.
A list of Supported Keywords is available.
IBIS Repository within the Analysis environment
On import, the IBIS and related files are copied into a repository within the Analysis environment.
For IBIS V5 and higher files, which may contain AMI model files, these files are copied as well when an import has been made successfully.
The IBIS repository is located within the user folder in ...\eCADSTAR\eCADSTAR [version]\Analysis\system\system_lib\simlib\ibis.
SPICE Import
When SPICE files are opened the Data view shows general SPICE file information followed by the list of models contained.
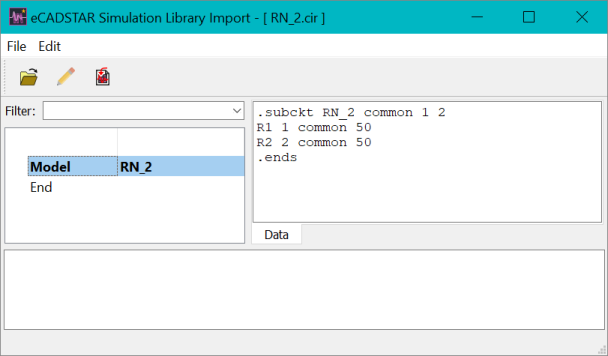
- Select the entry marked in bold to allow the import of the selected SPICE circuit. A device is created automatically which holds the circuit model.
- Click the Import button in the toolbar to launch the import process. The Import Assistant dialog provides guidance and useful options on the import process.
- In case of errors occurring during the import, these are listed in the comment section at the lower part of the dialog. See here Simulation Library Manager: SPICE Import Support for details.
IdEM Import
The 3rd party tool IdEM (eCADSTAR Edition) can be used to generate circuit models based on S-Parameter data. Open the XML model file to import the generated model files into the Simulation Library.
Importing IdEM model files works in the same way as with other supported file types.
- Select a model marked in bold to allow the import of the selected model from the XML file(s).
- Click the Import button in the toolbar to launch the import process. The Import Assistant dialog provides guidance and useful options on the import process.
- The IdEM model description contains a set of files, which not only contain the circuit model itself, but also related data regarding the model status.
Once the import process is started a number of checks are performed. Checks that cause an error to be displayed and prevent model import:
- You have READ permission for the selected files.
- All of the required model data is present.
- Data checksum tests indicate that the data is unmodified since generation.
- The eCADSTARmodel was generated from a causal S-Parameter model. Non-causal models are rejected and an error message displayed. For further information on causality, see the IdEM documentation.
- The number of ports in the generated eCADSTAR model does not exceed the maximum supported.
Checks that cause a warning to be displayed, but enable model import after user acknowledgment:
- The eCADSTAR model was generated from a passive S-Parameter model. Non-passive models are allowed, but results are likely to be unreliable. Models suitable for reliable eCADSTAR simulation must not represent any amplification of input signals (gain).
Once imported, the models are displayed in the Models tab of the Simulation Library Manager. They can be assigned to N-Port devices, and simulated in the normal way.
Imported IdEM models are not exported to the SPICE netlists; instead, a placeholder for the model is generated, and user intervention is required to insert the required SPICE modeling information.
IXF Import
IXF and IXFZ files are used to Export devices from the Simulation Library in order to transfer them to other libraries, for example in other departments, sites or projects. It can also be used to archive the devices and remove them from the active Simulation Library.
The IXF format is a deprecated format used in previous revisions of the Analysis Module. More recently, the IXFZ format is used to export the selected content.
Importing IXF(Z) files works in the same way as with other supported file types.
- Select a model marked in bold to allow the import of the selected device with all its models and package data as provided within the IXF(Z) file(s).
- Click the Import button in the toolbar to launch the import process. The Import Assistant dialog provides guidance and useful options on the import process.
