
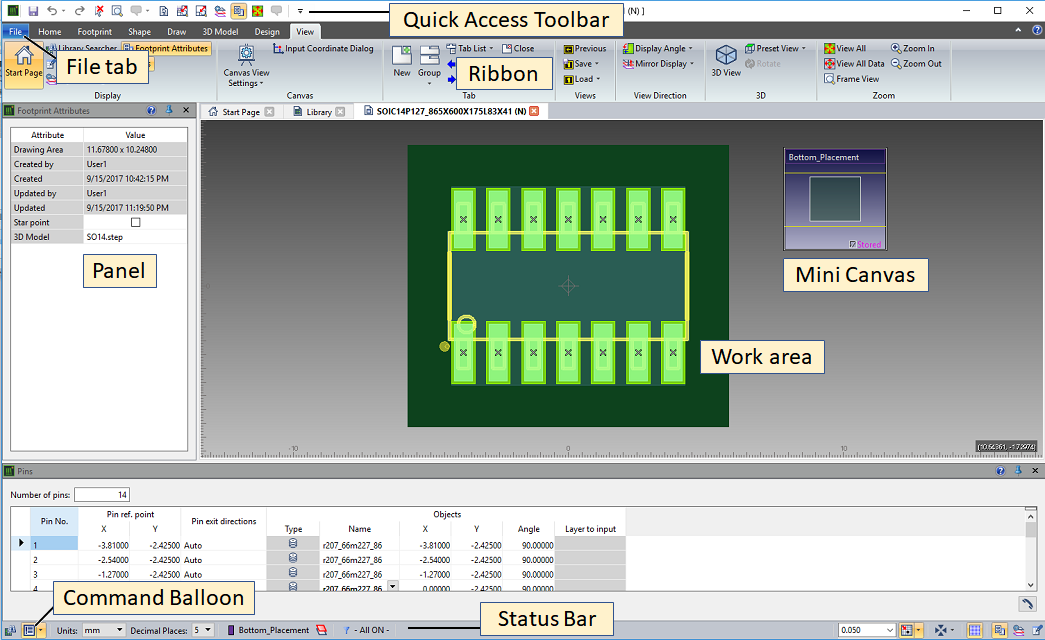
This topic describes the following items on the Footprint Editor main window.
- Work area
- Ribbon
- Quick access toolbar
- File tab
- Status bar
- Panel
- Command balloon
- Mini canvas
1. Work area
Footprint Editor allows you to open multiple windows in the work area.
- When a design is open, opening or closing another design terminates any commands that are currently running.
- Commands cannot be run simultaneously for multiple designs.
2. Ribbon
The ribbon is a layered element consisting of tabs, groups and commands.
Minimizing the Ribbon
Minimize the ribbon by selecting Minimize
the Ribbon from the assist menu or by clicking  at the right side of the ribbon.
- When you click the tab with the ribbon minimized, the ribbon temporarily exits minimized mode to allow you to operate the controls.
- When the operation on the control is finished, the ribbon is minimized again so that only the tab is displayed.
- To resize the ribbon to the original size, on the
assist menu click Minimize the Ribbon
again. Alternatively, click
 at the right side of the ribbon.
3. Quick access toolbar
Frequently-used command buttons such as Undo, Redo, Display All and Zoom are available.
Changing the Display Position
- To move the quick access toolbar to below the ribbon, select Show Below the Ribbon from the setting button, at the right side of the Quick Access Toolbar.
- To return it to its original position, select Show Above the Ribbon from the same location.
Deleting a Control from the Quick Access Toolbar
- To delete a control from the Quick Access Toolbar, right-click a control and select Remove from Quick Access Toolbar on the assist menu.
- To restore a deleted control, click the label of the relevant control from the setting button at the right side of the Quick Access Toolbar.
4. File tab
File operations, and general application setting functions are provided.
5. Status bar
The status bar displays information about the active layer, and about the object filter. The operation modes for the application can also be checked and set from here.
6. Panels
The following panels display information for reference, or to set while creating a design.
- Layer Settings panel: specify the active layer, visible layer, and layer settings.
- Properties panel: view and edit the properties of a selected object.
Show or hide the Layer Settings
panel by clicking  () on the status bar, or by clicking View
> Display > Layer
Settings on the ribbon.
() on the status bar, or by clicking View
> Display > Layer
Settings on the ribbon.
Show or hide the panel by clicking  on the status bar or by clicking View >
Display > Properties
on the ribbon.
on the status bar or by clicking View >
Display > Properties
on the ribbon.
7. Command balloon
The command balloon displays relevant guidance for the design situation, as well as warnings and errors.
- It can be shown or hidden by clicking on the status bar.
- Resize the command balloon by dragging its frame.
- Move the command balloon to a different location by dragging a part other than the frame.
8. Mini canvas
The view window displays an overall view of the footprint data, and the current display area. From the mini canvas, you can change, save or retrieve the display area.
- The mini canvas can be shown or hidden by clicking
View > Canvas > Canvas View Settings
split button >
 Mini Canvas on the Footprint Editor ribbon.
 - Resize the mini canvas by dragging its frame.
- Move the mini canvas to a different location by dragging a part other than the frame.
- However, dragging the display area represented as a yellow figure changes the display area.
- Drag the mini canvas to any location by holding down the center button.
