
The Export command allows you to store results data in either CSV or image format. Launch this command from the File menu or from the assist menu in the Analysis Result Viewer.
Format: CSV
If you select CSV in the Format box, then the results data are exported in CSV format. CSV files can be opened by many tools for post-processing purposes. The target data for the export are configured using the toolbar filter buttons and the Visibility check boxes in the Working Set. Only visible charts of the active Working Set are exported. Visible charts are always exported with their full data range, regardless of the current zoom range. Exported values are typically given in base units (V, Hz, Ω).
| Value | Description | |
|---|---|---|
| Destination | Displays the path to exported file. Click |
|
| Allows you to specify the location and name of the exported file by browsing to it in the file system. If the file already exists, a warning dialog asks for confirmation to overwrite it. If the file cannot be written because it is already open in another tool, for example, then a warning dialog is displayed and the export file is not created. If you select Export and Open Destination Folder by pointing the cursor at the Export button and selecting it from the displayed options, then the destination folder is displayed when the file is exported. | ||
| Output Selection |
Note
The options in this section depend on how the Export dialog is launched.
|
|
| Format | Allows you to specify the separator symbol in the exported CSV file. You can also exclude additional header information from the CSV files, such as the creation date and version information. | |
| Separator | Allows you to choose the separator symbol from the following
options.
|
|
| Print extended header | If deselected, then additional header information is excluded from the CSV files, such as the creation date and version information. This may be necessary to prevent this data from corrupting the import function in a target application. |
CSV Output File
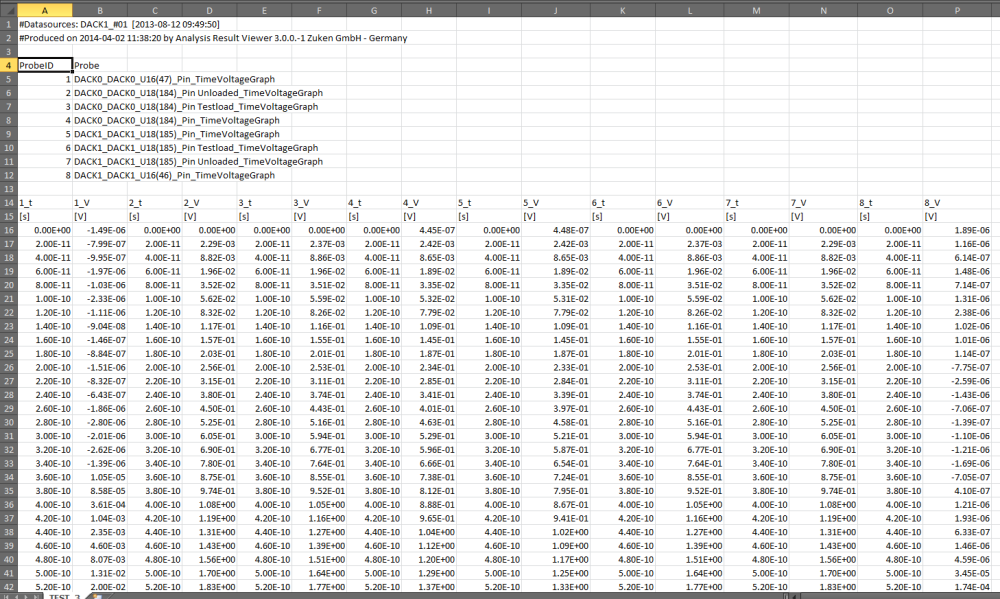
The CSV file contains all selected charts, each with x and y data. If the extended header information is selected, then detailed column headers are displayed before the actual data. Otherwise, the column header contains the full and unique description of the probe, per column. The following image shows an example in MS Excel with extended header information enabled.
Note
CSV export is not available in SI Eye Pattern mode.
Image Export
If you select CSV in the Format box, then the results data can be exported in the following image formats: png, jpg and bmp. The size and resolution of the image are exported as shown on the screen. For the highest quality, maximize the size of the application and export only a single chart. This is done by right-clicking a chart, and selecting Export on the assist menu.
- If you launch the Export dialog from within a selected chart, then only the relevant chart is exported.
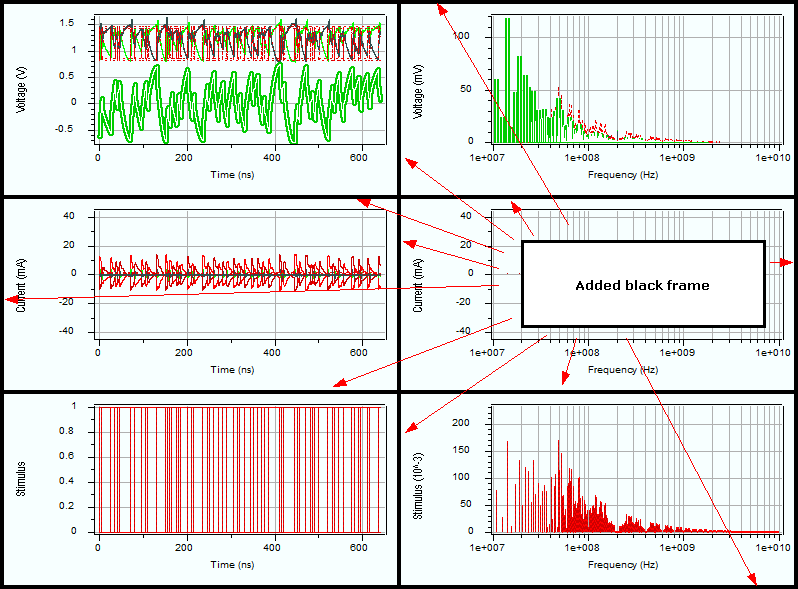
- If you launch the Export dialog from the File menu or the assist menu of a Working Set, then you can export the full probe set that is selected. The individual charts are separated by a black frame surrounding each chart.
| Value | Description | |
|---|---|---|
| Destination | Displays the path to exported file. Click |
|
| Image Format | Select from one of the following image formats: png, jpg and bmp. | |
| Allows you to specify the location and name of the exported file by browsing to it. If the file already exists, then a confirmation dialog is displayed. If the file cannot be written because it is already open in another tool, for example, then a warning dialog is displayed and the export file is not created. If you select Export and Open Destination Folder by pointing the cursor at the Export button and selecting it from the displayed options, then the relevant folder is displayed when the file is exported. |
The output selection depends on how the Export dialog is launched.
- If it is launched from within a selected chart, then only the relevant chart is exported.
- If it is launched from the File menu or the assist menu of a Working Set, then you can export the full selected Probe Set. The individual charts are separated by a black frame which surrounds each chart. This is illustrated below.
| Value | Description | |
|---|---|---|
| Export | Starts the export process. | |
| Export and Open Destination Folder | If you point the cursor at the Export button and select Export and Open Destination Folder, then the destination folder is displayed when the file is exported. | |
| Cancel | Aborts the export process. | |
| Help | Launches the Online Help for the Export dialog. |
